
Spin up a sovereign rollup locally
Modern L3 appchain boilerplates have collapsed the time from idea to running node. You can stand up a fully functional sovereign rollup on localhost in under five minutes. This speed allows developers to test logic, verify gas economics, and debug smart contracts without touching mainnet or waiting for block confirmations.
The following steps guide you through cloning a standard boilerplate, configuring the local environment, and launching the rollup. We use a generic stack that mirrors the architecture of popular L3 solutions, ensuring the workflow applies whether you are building on Starknet, Optimism, or Base.
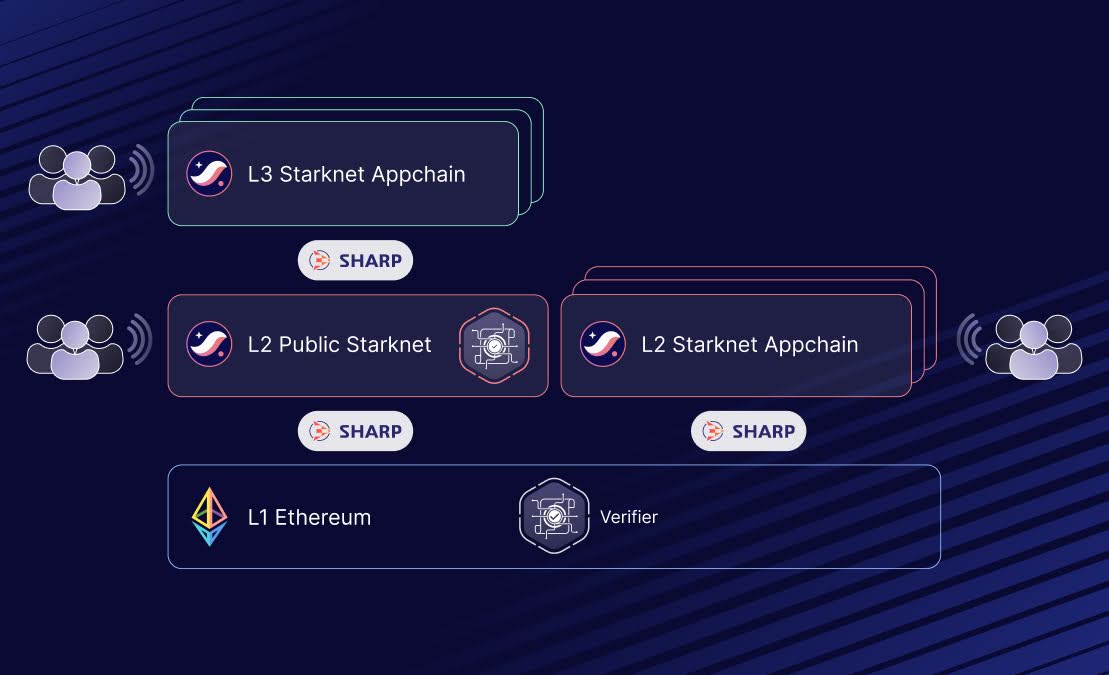
Start by cloning a verified L3 appchain boilerplate from GitHub. Look for repositories that include a pre-configured foundry or hardhat setup alongside a sequencer binary. Run git clone <repo-url> and enter the directory. This gives you the smart contracts, the sequencer node, and the L2-to-L1 message bridge code in one place.
Copy the .env.example file to .env. Set PRIVATE_KEY to a local test wallet address and configure RPC_URL to point to your local node (usually http://127.0.0.1:8545). If the boilerplate supports custom gas tokens, define the GAS_TOKEN address here. Accurate configuration here prevents most "connection refused" errors during launch.
Run the deployment script using your preferred tool, such as forge script or yarn deploy. This step compiles your Solidity contracts and pushes them to the local L2 environment. Verify that the contract addresses are logged to the terminal. These addresses are your entry points for interacting with the rollup once the sequencer starts.
Start the sequencer node with npm run sequencer and the verifier node with npm run verifier. The sequencer will begin producing blocks locally, while the verifier checks the validity proofs. You should see block numbers incrementing in the terminal logs. This confirms that your sovereign rollup is actively processing transactions.
Point your wallet (like MetaMask) to http://127.0.0.1:8545 with your local chain ID. Send a test transaction to your deployed contract. If the transaction is included in a block and the state changes, your L3 appchain boilerplate is fully operational. You now have a local sandbox for rapid iteration.
This local setup mirrors production behavior closely enough for 90% of development tasks. By keeping the rollup on localhost, you eliminate gas costs and network latency, allowing you to iterate on L3 appchain boilerplates with maximum speed.
Configure the L2 settlement layer
Your L3 appchain boilerplates rely on an underlying Layer 2 for security and data availability. Connecting to the right L2 provider is the first critical step in deployment. This connection dictates your transaction costs, finality speed, and overall network reliability.
Select your L2 provider
Choose an L2 network that aligns with your app’s specific needs. Starknet, Arbitrum, and Optimism are common choices, each offering different trade-offs in terms of EVM compatibility and security models. For L3 appchain boilerplates, Starknet is often preferred for its high throughput and customizability, allowing you to fully control your dApp’s logic while settling on a secure L2.
Update the boilerplate configuration
Once you have selected your L2, you need to update your boilerplate’s configuration file. This involves setting the correct provider URL and chain ID. Ensure these values match your chosen L2 network exactly to avoid connection errors during deployment.
{
  "l2Provider": "https://your-l2-provider-url.com",
  "chainId": 12345,
  "network": "mainnet"
}
Verify the connection
After updating the configuration, run a local test to verify the connection. Check that your L3 can successfully post data to the L2 and receive receipts. This step ensures that your settlement layer is correctly integrated before you proceed to mainnet deployment.
Bridge the settlement layer
Connecting your L3 appchain boilerplate to the L2 settlement layer is the final step in creating a sovereign rollup. This bridge enables assets and data to move securely between the layers. Without this connection, your L3 remains isolated, unable to inherit the security of the underlying L2 chain.
The process involves configuring the bridge contracts so they recognize your L3's block headers and validate state roots. This setup ensures that any transaction finalized on your L3 is ultimately settled and verified on the L2, maintaining the integrity of the entire system.
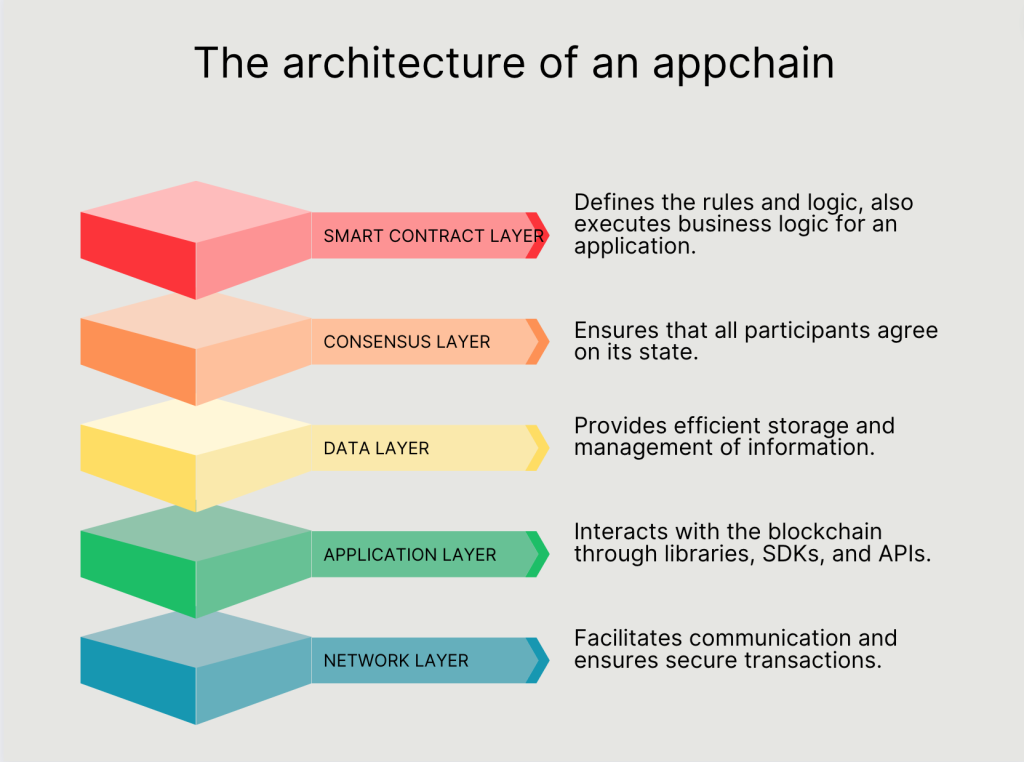
Start by defining the bridge parameters in your deployment script. Specify the L2 gateway contract address and the L3 block time. These values determine how frequently your L3 submits state roots to the L2, balancing finality speed with gas costs. Ensure the parameters match the security model of your chosen L2.
Deploy the bridge contracts to both the L2 and L3. The L2 contract acts as the settlement layer, while the L3 contract handles the initial validation of incoming and outgoing transfers. This dual deployment creates the trustless path for assets to flow between your sovereign rollup and the broader network.
Initialize the bridge state by setting the initial root hash on the L2 contract. This step anchors your L3's genesis state to the L2, establishing the starting point for all future state transitions. Verify that the initialization transaction is confirmed on the L2 before proceeding to test asset transfers.
Conduct end-to-end tests by transferring tokens from the L2 to your L3 and back. Monitor the bridge events to ensure that state roots are being submitted correctly and that assets are being locked or unlocked as expected. This validation confirms that your L3 appchain boilerplate is fully integrated with the settlement layer.
Configure RPC endpoints
Your L3 appchain boilerplate is only as useful as its ability to communicate with the outside world. Frontend wallets, block explorers, and off-chain scripts rely on Remote Procedure Call (RPC) endpoints to read state and submit transactions. Without a properly configured RPC layer, your sovereign rollup remains an isolated experiment rather than an accessible application.
Start by identifying the internal port your node container exposes. Most boilerplates map the JSON-RPC interface to a local port, such as 8545 or 8555. Verify this mapping in your docker-compose.yml or Kubernetes service definition. If you are running locally, ensure your firewall allows traffic on this port so your browser-based wallet can connect.
For production deployments, avoid exposing the raw node port directly to the public internet. Instead, route traffic through a reverse proxy or a dedicated API gateway. This setup allows you to implement rate limiting, authentication, and SSL termination. Tools like Nginx or Cloudflare can sit in front of your L3 appchain boilerplates to manage traffic spikes and protect against denial-of-service attacks.
Finally, test the configuration using a simple curl request or a tool like web3.js. Call eth_blockNumber to confirm the node is syncing and responding correctly. Once the endpoint is verified, update your frontend environment variables with the new RPC URL. This step finalizes the bridge between your blockchain infrastructure and the user interface.
Integrate DevRel kits for adoption
Boilerplate deployment is only half the equation. To ensure your L3 appchain boilerplates gain traction, you must immediately integrate the included DevRel kits. These kits are designed to bootstrap community engagement and streamline developer onboarding from day one.
The 2026 DevRel Playbook emphasizes that scaling community requires more than just code; it requires a structured outreach strategy. By leveraging these kits, you can standardize your messaging and reduce the friction for new users joining your ecosystem.
Pre-deployment checklist
Before you go live, ensure the following components are configured. This checklist helps prevent common onboarding bottlenecks.
- Social Setup: Configure official Discord, Twitter, and Telegram channels with automated welcome bots.
- Documentation Review: Verify that the developer docs are linked in all social bios and the website footer.
- Community Channels: Create dedicated support and feedback channels to capture early user sentiment.
Onboarding workflow
Once the kits are integrated, focus on the developer journey. Use the provided templates to send immediate feedback loops to new users. This proactive approach builds trust and encourages long-term participation in your L3 appchain ecosystem.
Common mistakes to avoid
Many teams overlook the importance of consistent messaging. Ensure your DevRel kit aligns with your brand voice. Inconsistent communication can lead to confusion and a higher churn rate among early adopters.
Frequently asked: what to check next
Validate the L3 appchain setup
After deploying an L3 appchain boilerplate, you must verify that the rollup is correctly reading from its L2 settlement layer. This section provides concrete proof checks to ensure the L3 functions as a sovereign rollup.
Check L2 Data Availability
Confirm the L3 is synchronously reading data from the L2. The demo showcases a based L3 appchain synchronously reading data from its L2 settlement layer in real-time. Verify the block producer is submitting data commitments to the L2.
Verify State Root
Check the state root matches the L2's verified state. Ensure the L3's state root is included in the L2's calldata or blob data.
Test Sovereignty
Send a test transaction to the L3. Verify the transaction is processed by the L3 sequencer and included in the L3 block. Ensure the transaction is not dependent on external L1 confirmations for immediate finality within the L3.
Common l3 deployment: what to check next
L3 appchain boilerplates reduce initial setup time, but they introduce specific technical tradeoffs around settlement, security, and community integration. Below are answers to the most frequent questions developers ask when moving from prototype to production.
These questions highlight the balance between speed and control. Use boilerplates to get to market fast, but audit every component before mainnet launch.
No comments yet. Be the first to share your thoughts!