Why L3 appchains need better tooling
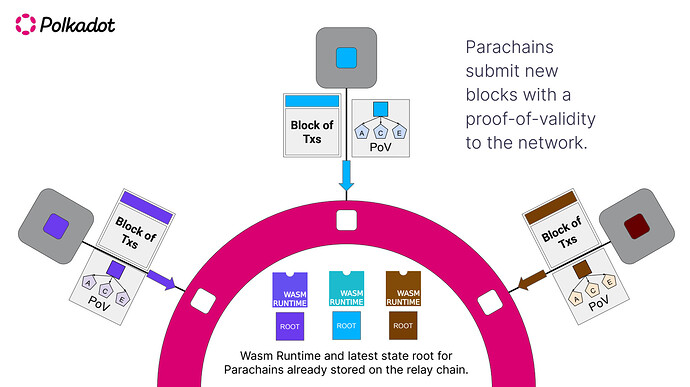
Building an L3 appchain from scratch is a significant engineering burden. Layer 3 networks process transactions within their own execution environment and settle them to a Layer 2, which then batches and settles transactions to Layer 1. This three-tier structure creates a complex infrastructure stack that requires precise configuration of consensus, sequencers, and data availability layers.
Without proper scaffolding, developers spend weeks configuring the OP Stack or similar frameworks rather than building their application logic. This overhead defeats the purpose of using an L3, which is supposed to offer complete flexibility for app builders to create independent chains using Ethereum's EVM as a base.
Modern boilerplates solve this by providing pre-configured, production-ready templates. They abstract away the complex networking and consensus details, allowing you to spin up a functional L3 node in minutes. Instead of wrestling with low-level protocol parameters, you can focus on customizing the execution environment to fit your specific dApp needs. This shift from infrastructure management to application development is the primary reason boilerplates have become essential for L3 builders.
Choose your L3 infrastructure stack
Boilerplates for L3 appchains generally fall into two distinct camps: rollup-based stacks like OP Stack and Arbitrum Orbit, or ZK-based stacks like Starknet and Polygon CDK. Your choice here dictates the development experience, the security model, and the complexity of your deployment pipeline. Most modern boilerplates abstract away the heavy lifting, but they still require you to commit to a specific cryptographic proof system.
Rollup-based L3s are the current standard for speed and ease of development. They rely on optimistic verification, meaning transactions are assumed valid unless proven otherwise. This allows for near-instant finality and a development environment that feels identical to Ethereum Mainnet. Boilerplates like the OP Stack are mature, with extensive tooling and a large pool of developers who already know how to write Solidity for them. If your priority is rapid iteration and compatibility with existing Ethereum tooling, a rollup-based boilerplate is the pragmatic choice.
ZK-based L3s offer a different trade-off: cryptographic proof of validity. Every transaction batch is accompanied by a zero-knowledge proof that is verified on-chain before settlement. This provides stronger security guarantees and faster finality for users, as you don't need to wait for a challenge period. However, the development complexity is higher. ZK rollups often require specific toolchains or circuit-aware coding, and the overhead of generating proofs can introduce latency in the deployment pipeline. Boilerplates for ZK stacks are newer and less standardized than their rollup counterparts.
The following comparison breaks down the key differences between these two approaches to help you select the right boilerplate for your appchain.
| Feature | Rollup-Based (OP Stack/Orbit) | ZK-Based (Starknet/CDK) |
|---|---|---|
| Verification Model | Optimistic (fraud proofs) | ZK Proofs (validity proofs) |
| Finality Speed | Slower (requires challenge period) | Faster (proof-based) |
| Development Complexity | Low (EVM-native) | High (circuit-aware/tooling) |
| Security Guarantee | Relies on economic slashing | Cryptographic proof |
| Boilerplate Maturity | High (mature ecosystems) | Growing (rapidly evolving) |
Selecting a rollup-based boilerplate is often the safer bet for teams prioritizing speed-to-market and EVM compatibility. The ecosystem around OP Stack is robust, with many pre-built components available. If your application requires strict cryptographic security guarantees or lower gas costs at the settlement layer, a ZK-based boilerplate may be worth the additional development overhead. Evaluate your team's expertise and your app's specific latency requirements before committing to a stack.
Set up the L3 appchain boilerplate
Boilerplates like Spire’s Pylon and the OP Stack abstract the heavy lifting of node synchronization, allowing you to spin up an L3 in minutes rather than months. Instead of managing individual infrastructure components, these frameworks provide a unified environment for execution, settlement, and data availability.
The setup process follows a strict sequence: cloning the repository, configuring environment variables for your specific L2 settlement layer, and deploying the node. This guide focuses on the Spire Pylon boilerplate, which is designed for based L3s that synchronously read data from their L2 layer in real-time.
Start by cloning the Spire Pylon repository to your local machine. This repository contains the pre-configured Docker images and scripts needed to run the node. Use the standard git clone command followed by the repository URL provided in the Spire documentation. Navigate into the project directory immediately after cloning to begin configuration.
The boilerplate relies on a .env file to define critical parameters such as the L2 chain ID, RPC endpoints, and gas limits. Open the .env.example file and rename it to .env. Update the values to match your specific L2 settlement layer (e.g., Base, Arbitrum, or Optimism). Ensure the CHAIN_ID and L2_RPC_URL are accurate, as mismatches here will prevent the L3 from syncing with the settlement layer.

Before deployment, you must generate the genesis block for your L3. This file defines the initial state of the chain, including pre-funded accounts and consensus parameters. Run the initialization script provided in the boilerplate, which typically reads from your .env file to populate the genesis.json. This step ensures your L3 starts with the correct state root derived from the L2.

With the configuration complete, deploy the node using the provided Docker Compose script. This command starts the execution client, the consensus client, and the data availability layer simultaneously. Monitor the logs to confirm that the node begins syncing blocks from the L2. Once the sync is complete, your L3 appchain boilerplate is live and ready for smart contract deployment.
Integrate DevRel kits for user onboarding
Building the chain is only half the work. If users cannot fund their wallets or understand your documentation, the appchain fails regardless of its technical performance. Modern boilerplates solve this by bundling essential DevRel tools directly into the deployment environment. These kits ensure that your L3 appchain is not just a set of smart contracts, but a functional product ready for public interaction.
The primary goal is to reduce friction. A user should be able to acquire testnet tokens, view their transaction history, and read clear documentation without leaving your ecosystem. Boilerplates like those built on the OP Stack or Spire often include pre-configured faucets and explorers, allowing you to focus on the user experience rather than infrastructure maintenance.
Deploy the faucet and explorer
Your first priority is liquidity visibility. Without a working faucet, users cannot interact with your dApp. Most boilerplates provide a script to spin up a faucet service connected to your L3 execution layer. Configure this service to distribute tokens automatically upon request. Simultaneously, integrate a block explorer. This provides transparency, allowing users to verify transactions and contract states. Without these two components, you are asking users to trust blind, which drastically reduces adoption.
Standardize wallet integration
Users expect seamless wallet connections. Do not force them to manually configure network RPC URLs or chain IDs. Your boilerplate should expose a standardized wallet connector (such as WalletConnect or MetaMask injection) that automatically detects your L3 chain configuration. This includes the correct chain ID, currency symbol, and RPC endpoint. By hardcoding these values into the frontend boilerplate, you eliminate the most common point of failure for new users trying to connect their wallets.
Publish developer documentation
Documentation is your first line of support. Use the boilerplate’s built-in documentation generator to create a public site that explains your chain’s unique features, tokenomics, and integration guides. Include code snippets for common tasks like bridging assets or deploying contracts. Clear, accessible docs reduce the burden on your support team and empower developers to build on top of your L3. Treat this as a product feature, not an afterthought.
Checklist for essential DevRel components
-
Faucet service deployed and accessible
-
Block explorer indexed and live
-
Wallet connector configured with chain metadata
-
Public documentation site generated and hosted
Common deployment mistakes to avoid
Boilerplates accelerate L3 appchain setup, but they don’t fix underlying configuration errors. When deploying via OP Stack or Spire, developers often copy defaults without auditing critical parameters. These oversights lead to failed transactions, stalled sequencers, or insecure RPC endpoints.
Incorrect gas limits
Boilerplates often set conservative gas limits for block production. If your dApp executes complex smart contracts, these defaults cause transaction reverts. Check your block_gas_limit in the rollup config. Increase it only if your application logic requires more computational headroom, keeping it within the L2’s maximum constraints.
Missing sequencer setups
A common pitfall is deploying the execution layer without a running sequencer. Without a sequencer, your L3 cannot process transactions or produce blocks, leaving the chain idle. Ensure your deployment script explicitly starts the sequencer service and verifies it is syncing with the L2 data availability layer before considering the appchain "live."
Poor RPC configuration
Exposing internal RPC ports to the public internet is a security risk. Boilerplates may default to binding RPC services to 0.0.0.0. Restrict access to specific IP ranges or use a reverse proxy. Always verify that your JSON-RPC endpoints are authenticated and rate-limited to prevent denial-of-service attacks on your new L3 infrastructure.
L1, L2, and L3 blockchain differences
Understanding these layers is essential before choosing a boilerplate for your appchain. Each layer serves a distinct function in the stack, from raw security to user-facing execution.
Layer 1 (L1) is the base settlement layer. It provides the final security and consensus for the network. Examples include Bitcoin and Ethereum. When you build an L3 appchain, you are building on top of existing infrastructure rather than starting from scratch.
Layer 2 (L2) handles scaling. It processes transactions off the main chain to reduce costs and increase speed, then settles the final state back to L1. Popular L2s like the OP Stack or Arbitrum provide the modular backbone that L3s connect to.
Layer 3 (L3) is the execution layer. It hosts specific applications and processes transactions within its own environment. L3s settle their batches to L2, which then settles to L1. This three-tier structure allows your appchain to have dedicated resources while inheriting the security of the underlying layers.
No comments yet. Be the first to share your thoughts!