Why L3 appchain boilerplates matter
L3 appchains give you dedicated blockspace and custom execution logic for a single application. Instead of competing for shared resources on a Layer 2, your app runs in its own environment. This setup is essential when you need predictable performance or specialized virtual machine logic that standard L2s don’t support.
Building this infrastructure from scratch is risky and time-consuming. You have to configure consensus, networking, and security modules while ensuring they integrate correctly with the underlying L2. One misconfigured parameter can lead to downtime or vulnerabilities. Starting with an L3 appchain boilerplate removes this friction. These kits provide pre-tested templates for the core infrastructure, allowing you to focus on your application’s unique features rather than reinventing the wheel.
Using a boilerplate also accelerates your development cycle. You skip the initial setup phase and move straight to testing your specific use case. This approach is faster and safer, letting you validate your concept quickly before committing to a full production rollout.
Choose your base chain and sequencer
Selecting an L3 appchain boilerplate starts with picking a settlement layer. Your choice determines gas costs, finality speed, and the maturity of developer tooling. You need a stack where the base chain provides security and the sequencer ensures fast, predictable execution for your specific application.
Base: Synchronous Composability
Base offers a straightforward path for L3s that prioritize synchronous composability with its L2. Spire’s documentation highlights this as a landmark feature, allowing your L3 appchain to interact directly with the Base ecosystem without complex bridging. This setup is ideal if you want to leverage Base’s existing liquidity and user base immediately.
Starknet: High-Throughput Customization
Starknet supports L3 appchains with a focus on high throughput and customizability. Builders seeking full control over dApp logic often choose this stack because it settles on L2 while offering dedicated blockspace. The architecture allows you to tailor the execution environment to your needs, though it requires a deeper understanding of the Starknet ecosystem.
Bitcoin: Predictable Execution
For applications needing the security of Bitcoin, Citrea provides Bitcoin Appchains (L3). This stack is useful when you want dedicated blockspace and predictable execution for a single application without competing for general L2 capacity. It settles on Bitcoin directly, offering the highest level of security at the cost of higher latency and more complex tooling.
Comparison of L3 Options
Use this table to compare the primary trade-offs between the most common L3 appchain boilerplate stacks.
| Base Layer | Sequencer | Settlement | Best For |
|---|---|---|---|
| Base | Spire | Base L2 | Synchronous composability |
| Starknet | Madara/Shared | Starknet L2 | High throughput & customization |
| Bitcoin | Citrea | Bitcoin L1 | Maximum security & predictability |
Forking and configuring the L3 appchain boilerplate
L3 appchain boilerplates remove the heavy lifting of building a rollup from scratch. Instead of writing consensus logic and sequencer infrastructure, you fork a verified codebase, adjust the configuration, and deploy. This section walks through the standard workflow: cloning the repository, installing dependencies, and configuring the local node.
The process mirrors setting up a foundation for a house. You don't pour the concrete yourself; you pour it into a pre-fabricated mold. The boilerplate is that mold. Your job is to ensure the mold fits your specific appchain requirements.
1. Clone the repository
Start by selecting a reputable L3 appchain boilerplate. The Starter Index catalogs dozens of options, but for this guide, we assume you have chosen a standard Ethereum L3 stack like the OP Stack or a ZK-based alternative. Clone the repository to your local machine using the standard git command.
git clone https://github.com/your-chosen-repo/appchain-boilerplate.git
cd appchain-boilerplate
Verify the branch you are on. Most boilerplates have a main branch for production and a develop or staging branch for testing. Stick to the stable branch unless you are contributing to the boilerplate itself.
2. Install dependencies
Modern L3 boilerplates rely on Go for the node implementation and TypeScript or Rust for the smart contract and tooling layers. Install the required dependencies using the package manager specified in the repository's package.json or go.mod file.
# For Node-based tooling
npm install

# For Go-based node
make deps
Ensure your local environment matches the version constraints. Mismatched Go or Node versions are the most common cause of build failures in L3 development. The boilerplate should specify the exact versions in a .tool-versions or .nvmrc file.
3. Configure the node
Before running the node, you must configure the parameters. This includes setting the chain ID, gas limits, and sequencer endpoints. Most boilerplates provide a .env.example file. Copy this to .env and fill in the values.
# docker-compose.yml snippet
services:
  op-node:
    environment:
      - L2_ETH_RPC=http://localhost:8545
      - L2_BEACON=http://localhost:5052
      - SEQUENCER_ENABLED=true
If you are using a local L2 testnet (like Goerli or Sepolia) as the settlement layer, ensure your RPC endpoints are correct. The node needs to read L2 blocks and post L1 transactions to finalize state.
4. Run the local environment
With dependencies installed and configuration set, start the local development environment. Most L3 boilerplates use Docker Compose to orchestrate the sequencer, batch submitter, and rollup node.
docker compose up -d
Monitor the logs to ensure all services are healthy. The sequencer should be producing blocks, and the batch submitter should be posting data to the L1 settlement layer. If the node fails to start, check the logs for configuration errors or network connectivity issues.
5. Verify the deployment
Once the node is running, verify that it is producing blocks. Use a block explorer or a simple curl command to check the latest block number. If the block number is increasing, your L3 appchain boilerplate is configured correctly.
curl -X POST http://localhost:8545 \
  -H "Content-Type: application/json" \
  -d '{"jsonrpc":"2.0","method":"eth_blockNumber","params":[],"id":1}'
A successful response confirms that your local L3 node is operational. You can now begin deploying smart contracts and testing your application logic.
Integrate DevRel kits for adoption
L3 appchain boilerplates are most effective when they include ready-made DevRel kits. These kits remove the friction of onboarding new developers and users by providing standardized tools for documentation, community management, and SDK integration.
1. Standardize SDK Integration
Begin by embedding your L3 SDK into the boilerplate’s frontend structure. This ensures that any developer using the template connects to the correct network endpoints and smart contract interfaces without manual configuration. A clean, copy-pasteable integration reduces setup time from days to minutes.
// Example: Initializing the L3 SDK in a Next.js app
import { createL3Client } from '@your-l3/sdk';

const l3Client = createL3Client({
  chainId: process.env.NEXT_PUBLIC_L3_CHAIN_ID,
  rpcUrl: process.env.NEXT_PUBLIC_L3_RPC_URL,
});

export default l3Client;
2. Deploy Documentation Templates
Include a pre-configured documentation site within the boilerplate. Use static site generators like Docusaurus or Mintlify, pre-filled with placeholder content that explains the L3’s unique features. This gives new teams a professional starting point for their own guides, ensuring consistent messaging about the L3’s capabilities.
3. Connect Community Dashboards
Integrate community dashboard widgets, such as Discord bots or analytics trackers, directly into the boilerplate’s backend. This allows developers to monitor user engagement and transaction volumes from day one. Automated onboarding flows, triggered by these dashboards, can guide new users through their first transaction, increasing retention.
By bundling these DevRel components, L3 appchain boilerplates become more than just code—they become complete onboarding ecosystems that accelerate adoption.
Verify the L3 appchain boilerplates setup
Before deploying to mainnet, you must confirm that the L3 appchain boilerplates execute transactions correctly and settle proofs on the L2. This verification phase ensures that your custom logic and gas configurations are sound.
Launch the L3 node and verify it is fully synced with the execution layer. Check the logs for any sync errors or connection drops to the L2 bridge contracts. A healthy node should report consistent block heights.
Send a batch of test transactions through the L3 appchain boilerplates. Monitor the gas consumption and confirm that the sequencer processes them without dropping packets. Compare the throughput against your expected benchmarks.

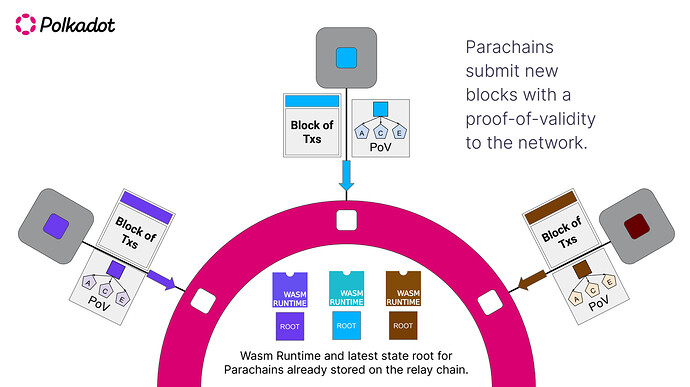
Confirm that the L3 generates valid state roots and submits them to the L2 settlement layer. Use a block explorer to trace the proof from the L3 output to the L2 inbox contract. Successful settlement proves the chain is secure and compliant.
Pre-launch verification checklist
Use this checklist to ensure no critical steps are missed before going live.
-
L3 node is fully synced with the L2
-
Gas token configuration is correct
-
Transaction throughput meets minimum thresholds
-
L2 settlement proofs are verified on-chain
-
Bridge contracts are accessible and functional
No comments yet. Be the first to share your thoughts!